The Bulk User Import tool makes it easy for you to import a prepared file into your Higher Logic Vanilla (Vanilla) community in order to manage multiple user records simultaneously.
The file can be used to:
- create new user records,
- update existing user records, or
- invite users to join your community.
Import methods
You can import the file into your Vanilla community by either:
- uploading it from a "local" device or
- downloading it from a URL/web address, such as https://yourdomain.com/user-upload.csv.
File type & size
The following conditions apply to any file used for this import, regardless of whether the file is uploaded from a device or downloaded from a URL.
File type: the only valid file type for these import options is .CSV
TIP: Refer to UTF-8 for character integrity, below, if you have non-English-language characters in usernames
File size: the maximum size for the import file is 50MB
UTF-8 for character integrity
If you anticipate having usernames that contain non-English-language characters, save the import file as a CSV UTF-8 (Comma delimited) .CSV file. This better ensures that these characters are preserved and the import file doesn't get corrupted.

Prepare the import file
Before you import a file, reference the example file image below and then review the information that follows it. This increases the likelihood that the data and fields in your file are correctly formatted and populated.

- The data must be in three consecutive columns, in the order shown above, with no preceding blank columns.
- The data can be in an unlimited number of consecutive rows, with each user record on its own row, and no preceding blank rows.
- Email addresses must be text; they cannot be links.
- Each row can have a maximum of three values; just two values is also valid in some instances.
- The import file can have a header row; however, this must be indicated by checking the relevant box so that the importer knows to skip this row.
- Refer to the sections below for information on the parameters (including details on which parameters are required and when) and the import options.
Email parameter
This parameter (column A in the example image) can contain any valid email address.
- If you're using the update option, this is the "controlling" parameter.
- The email address must be text; it cannot be a link.
- This parameter is required for all of the import options.
Username parameter
This parameter (column B in the example image) must be between a minimum of three characters and a maximum of 40 characters.
Username is the "controlling" parameter for the insert option and must be unique. If a duplicate username is in the import file, that entire row (of any subsequent instances) of data is purged from the import. Only the row that has the first instance of a username is imported.
Username exceptions
- If you're using the invitation option, username is optional and the "duplicate record" caveat does not apply.
- If you're using the update option, username is optional because email is the controlling parameter that determines which row is updated.
Role parameter
This parameter (column C in the example image) can have one or multiple values.
- The value must exactly match existing Roles in your Vanilla community; for example: Administrator is rejected if your community Role is Admin.
- The value is not case-sensitive; for example: admin and Admin are valid and treated the same.
- Multiple values must be separated by a colon ( : ); for example: guest:Member
- Roles that have spaces (e.g., Acct. Admin) do not require, but can be placed within, single ( 'Acct. Admin' ) or double ( "Acct. Admin" ) quotation marks.
Import options
There are three options (Invite, Insert, and Update) with the Bulk User Import tool. You choose an option after your file is loaded into the importer.
TIP: The table below is a quick reference of the parameter requirements for the import options.

Option 1 - Invite new users
Choose this option to send an email invitation to users to join your Vanilla community.
- The username parameter is optional for this option. If a user name is provided, it pre-populates the username field in the registration form, but can be changed by the user.
- The default "Invitation" email notification is sent. It includes a link that the users can click to log in and then set their preferred username and password.
Registration settings
To use this option, check the following settings on the User Registration Settings page (Settings > Membership > Registration) in the Dashboard.
- Make sure the Registration Method is set to Invitation.
- Make sure you have not exceeded the invitation "send" threshold that is set for your Role in Choose who can send out invitations to new members:. (Consider setting this to Unlimited to prevent this issue arising and causing delays.)
Option 2 - Insert new user records
Choose this option to create new user records in your Vanilla community.
- All three parameters are required.
- An email is sent to new users. It includes a link that the users can click to log in and then set their preferred username and password.
- If a user record (based on the username) already exists in the community and the email and/or role value differs from the existing record, the record is updated.
Option 3 - Update existing user records
Choose this option to update user records, based on email, in your Vanilla community.
- The email and roles fields are required but username is optional.
- If the value of role and/or username differs from the existing record, those values in the existing record are updated; new users are created and emailed.
Load the file
The file upload and start import actions are at the bottom of the Bulk User Import page. This is where you choose the import method and load the file into the importer.
1. Access the Dashboard.
2. Navigate to Settings > Import > Bulk User Import and scroll to the bottom of the page.

3. To load an import file, either:
- (Upload CSV) Click Choose Files to navigate to and select your prepared import file.
- (Download CSV) Specify the URL of where the import file is stored.
NOTE: If both methods are used, the Upload CSV option takes precedence.
4. Optionally, check the box to have the importer ignore the first row (column headers) of data in the file.
5. Click Start.
NOTE: You will select the import option on the next page.
IMPORTANT: The import will fail if the syntax of the CSV file is not correct; review the example earlier in this article.
Import the file
After you've loaded the import file and clicked Start, you have to choose an import option.
1. Review the name of the file and the row count to make sure they are what's expected.
NOTE: You can abort the process at this point by either clicking Back (to the Bulk User Import page to start again) or navigating away from the page.
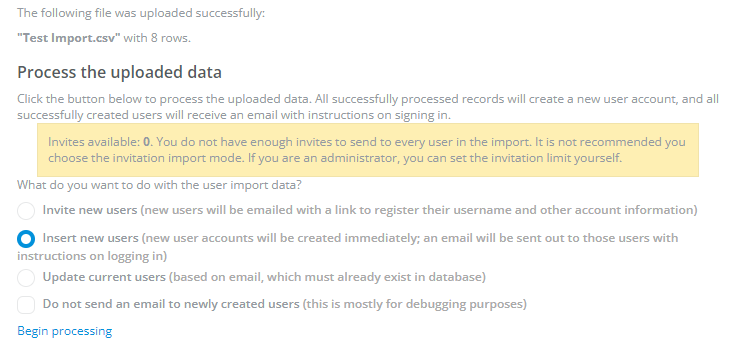
NOTE: If you get the "0 invitations available" message, you can either: choose a different import option or navigate to Settings > Membership > Registration and increase the invitation "send" threshold for your Role, if possible.
2. Choose one of the options under What do you want to do with the user import data?.
3. Click Begin processing.
Post-import notifications
After the import has processed, the page indicates the "success/failure" of the import, as shown in the following images.
Failed import
In this import, there were two errors, as indicated by Errors (2):
- The First line has headers box was not checked, so those [Line 1] values were deemed invalid.
- The Role in the community is administrator; admin does not match so it is invalid.

Successful import
Having used the error information, the corrections were made and the import was retried. This time, because there isn't an error message, we know that the import was successful.
