Badges promote participation in and commitment to your Higher Logic Vanilla (Vanilla) community, and they are a great way to recognize and reward accomplishments and community participation. Because of this, they're an important part of its social environment, as they give members extra incentive to be active and engaged.
Awarding a badge is not intended as an indicator of “the best.” Rather, badges should be one reward among many within a comprehensive gamification strategy that encourage and rewards participation in and acceptable behaviour in your Vanilla community.
Vanilla gives you:
- a ready-to-use set of badges (if you have the Badges addon and its enabled) and
- the ability to create your own custom badges.
This article describes both of these options, as well as how to manage your badges.
NOTE: Badge images can be of type .png, .jpg, .jpeg, and .svg.
Badges overview
All badges are configured with criteria that determine how and when they're awarded. The criteria can be:
- action-based (e.g., the user uploads a profile picture),
- threshold-based (e.g., user has been a member for five years), and
- reaction-based (e.g., user’s comment received five likes).
The flexibility of badges means that users can be directly and indirectly awarded for their participation.
Where do badges display?
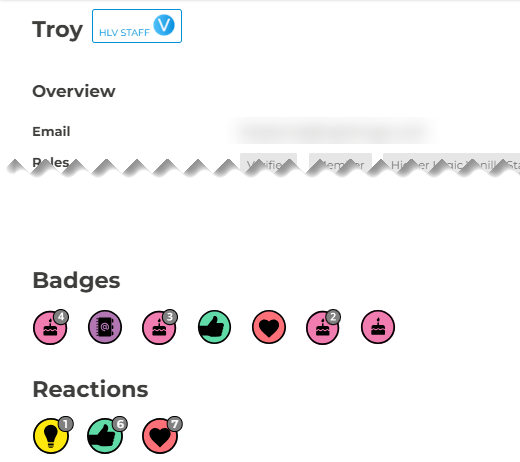
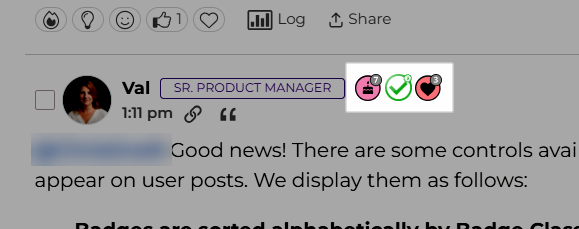
When a user earns a badge, it displays both on their profile and next to their name on their posts.
Profile example
Post example

NOTE: If your community is configured to use Custom Post layouts, you can control whether badges display on user posts via the Show Badges toggle in the following default widgets: Original Post, Comment Thread, and Q&A Comments.
If your community is configured to use Legacy Post layouts, badges only display if the Flair addon is enabled. Note that this addon is not listed on the Settings > Addons > Addons page and must be enabled by our Support Team.
How are badges sorted?
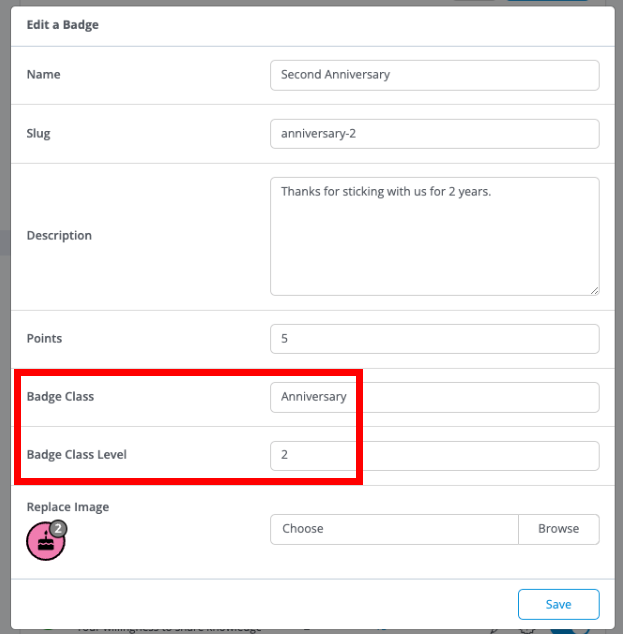
Admins can control which badges appear on user posts using Badge Class and Badge Class Level settings:
- Badges are sorted alphabetically by Badge Class (badges without a Class appear first, then alphabetically A–Z).
- Within each Class, only the highest-earned badge is shown to avoid duplicates.
To prioritize certain badges, adjust their Class name (for alphabetical sorting) and Level (to show the top badge in a class).
EXAMPLE: Refer to the image below. The Anniversary badge is earned each year. If someone has 7 Anniversary badges, only the 7th (highest earned) will display in the set because the Anniversary badges share a Class. And, since "Anniversary" comes first alphabetically, that badge is listed first.
How to manage your Badge Classes and Levels
Since Badge Class names are not visible to your users, you can reorder badges freely without affecting the user experience to ensure your badges display how your organization (and your users) prefer.
To manage your Badge Classes and Levels:
- Access the Dashboard.
- Navigate to Settings > Membership > Badges.
- Review your various Badge Classes and associated Levels to determine whether any should be updated. For example, if your staff or users would prefer a specific Class of badges to display with greater priority, consider renaming the Class name, with alphabetization in mind, to achieve that goal.

- To update a badge's Class and/or Level, click the associated badge's pencil (edit) icon.
- In the resulting dialog, update the Class and Level as desired and click Save.
- Repeat this process to refine and "reorder" how all badges in a Class will display for your users. For example, if you renamed the "Anniversary" Class name to something else, make that same change to the other badges in the set.
TIP: You can also update Vanilla's out-of-the-box badge classes and levels to reprioritize them.
Enable the Badges addon
The Badges addon must be enabled in your Vanilla community in order to use the out-of-the-box and custom badges.
- Access the Dashboard.
- Navigate to Settings > Addons > Addons.
- Click the Badges toggle to enable it.
- Click the settings icon to access your list of badges on the Manage Badges page.

Access your badges
You can manage various aspects of badges on the Manage Badges page. For example, you can create and edit, enable and disable, and configure settings for all badges.
In addition to the settings icon on the addons page, you can access your badges when you:
- Access the Dashboard.
- Navigate to Settings > Membership > Badges.

On this page, you can see which badges are enabled and disabled, and you can manage these settings with the toggle sliders.
Manage badge settings
In the upper right of the Manage Badges page (see image above), click the settings icon (to the left of the Add Badge button), to manage a few optional settings.
NOTE: These settings apply to all badges.
- Click the dropdown (or accept the default, None) to select which Roles (Administrator, Moderator) to exclude from Leaderboard widgets. This is often used to prevent organizational staff from dominating leaderboards, as staff generally have high engagement because of their roles.
- Slide the toggle (right = enabled, as shown) to set whether badges display on user cards.

Out-of-the-box badges
When the Badges addon is enabled, you have access to dozens of out-of-the-box badges. These are pre-configured and designed for different purposes, such as commenting, membership anniversaries, and to show approval.
Badge classes
The out-of-the-box badges are grouped into classes.
NOTE: Classes work behind-the-scenes with your gamification processing to reduce the number of badges that have to be queried, which speeds up the automated process for awarding badges.
Some of the classes (such as Commenter and Answerer) have multiple badges in order to accommodate (and encourage) continued activity. For example, a user can earn the First Comment badge for their first comment and then the 10 Comments, 100 Comments (and so on) badges as they continue to comment on community posts.

NOTE: The Answer badges are earned based on the number of Accepted Answers a user posts: only answers manually flagged as the Accepted Answer by a question's author count toward these badges.
View badge details
Click a badge’s name to view its details page, providing its description and the most recent recipients.
- Click your browser’s Back button to return to the list of badges.
- Users can get to this page by clicking the badge in their profile.

Enable/disable a badge
Use the slider next to a badge to control whether it's enabled or disabled.
- Disabled badges remain awarded to any users who had earned them, but they no longer display on user profiles.

Delete a badge
You can only delete custom badges that were created in your Vanilla community.
NOTE: You cannot delete any of the out-of-the-box badges.
- Click the trash can icon to delete a custom badge. At the confirmation prompt, click Okay.
Edit a badge
You can edit the various properties of badges by clicking the pencil icon next to the badge.
- Editing the name, description, and/or image of a badge will not affect its automated functionality, but it will update these properties for any users who have already earned the badge.
NOTE: Badge images can be of type .png, .jpg, .jpeg, and .svg.
- Editing the points of a badge will not change anything for any users who have already earned the badge.
- Out-of-the-box badges have an additional field, Threshold, which is part of the automation process for assigning badges.

The Slug field
The Slug field is what shows in the URL for the badge’s page; it's the badge's unique identifier. Some Slugs, (e.g., name-dropper) are text only, whereas others have a numeral to indicate a level, as in anniversary-4.
When editing a Slug, consider that the text part of a Slug supports its automation.

Referencing the image above:
- You can “safely” change the numerical level of a Slug. For example, change
comment-100 to comment-99. - If you change the text of a Slug, it will no longer be associated with any automation assigned to it. For example, do not change
comment-100 to remark-100.
IMPORTANT: Vanilla strongly cautions against changing the text of a Slug of any of the Vanilla out-of-the-box badges.
Create a badge
You can create your own custom badges for use in your Vanilla community.
1. On the Manage Badges page, click the Add Badge button above the list.

2. In the Add a Badge dialog, configure the options described below.

- Name - Provide a label that clearly indicates the purpose of the badge.
- Slug - The Slug must be unique, and should consist of only lower-case letters, numbers, and hyphens. Refer to The Slug field section in the Edit a badge section above for more information.
- Description - Explain the purpose of the badge and how users can earn it. This information appears on the badge's page.
- Points - Specify the number of points that users are awarded when they earn the badge.
- Badge Class and Badge Class Level - Use these optional fields to apply an internal-only classification to the badge. (Refer to Badge classes, above, for additional information.)
- Add Image - Use this field to add a 200px by 200px image for the badge.
NOTE: Badge images can be of type .png, .jpg, .jpeg, and .svg.
3. Click Save.
Understand custom badges
The custom badges that you create are unique to your Vanilla community. They can be awarded manually, via an API (as described in API v2 Reference & Endpoints), and automatically when a user comments on a specific post (as described in Badgify Comments).
If you want to automate a custom badge, there are a few options:
- Feature Request - Think your badge idea is awesome and would benefit our product and others? Submit your idea via our Product Ideas page.
- DIY - This method requires an experienced developer writing code that includes the criteria/action/logic in your Vanilla community and then, based on that logic, making a POST call to give the badge to the appropriate users. See API v2 Reference & Endpoints for more information.
Manually give a badge
Administrators and Moderators can manually give badges to users because the permission is built into those Roles (see Roles & Permissions). All badge permissions are grouped in the Reputation section of permissions, which applies only when the Badges addon is enabled. Users outside of the Administrator and Moderator Roles must have the appropriate permissions to manually give badges.

You can manually give a badge to users in two places; these are described in this section.
Manage Badges page
1. Click the Give Badge icon associated with the badge.

2. In the dialog, type the first name of the user in the Recipients field. As each letter is typed, matching usernames display below the field.

3. When you see the correct username, click to select it. The username now displays in the field.
- Repeat these steps to select additional recipients. The system automatically comma-separates recipient names.
4. Click Give Badge to finish.
A confirmation displays in the lower left and then the page returns to the list. The number in the badge’s Given column increments by the number of badge recipients.
User profile
To give a badge while on a user’s profile page:
1. Open the Options menu and select Give Badge.
NOTE: You cannot give badges to multiple users from this page. To do that, refer to the previous section, Manage Badges page.

2. In the dialog, click the dropdown and select a badge. A message displays if the selected badge has already been given to the user.

3. Optionally, provide a reason for giving the badge.
4. Click Give Badge to finish.
The profile page refreshes, and the badge now displays.
Revoke a badge
To revoke a badge that has been given to a user:
- Access the Dashboard.
- Navigate to Settings > Membership > Badges.
- Locate the badge that you want to revoke and click the number that displays in the Given column.
- Locate the username and click Revoke.

On the Manage Badges page, the number in the badge’s Given column decrements by one.
Request a badge
Users can request that a badge be given to them. Below are a few notes about badge requests.
- Only manually awarded badges can be requested (via the Request This Badge button on the badge’s description page).
- “Automatic” badges do not have an option to be requested.
- A user must have the
Badges > Request permission to be able to request a badge. To learn about this permission, see Roles & Permissions. - Badge requests require a reason as to why the user deserves the badge.
Manage badge requests
Administrators and Moderators can manage the badge requests in their Vanilla community.
- Access the Dashboard.
- Navigate to Moderation > Requests > Badge Requests.

A few notes about badge requests:
- Only Administrators and Moderators can approve or decline badge requests.
- Badge requests can be managed either individually or in bulk.
- Administrators and Moderators have an option under their Notification Preferences to set whether they want to be notified (by pop up or email message) of new badge requests.
Users’ badges
A list of earned badges displays in the lower portion of users’ profiles.
Here, you can:
- Click the name of the badge to visit the badge’s description page.
- Click the x (and Okay) to remove the badge.
- Click Comment to leave a comment for the user (refer to Comments, below).

Comments
Comments display under the associated badge.
- The creation time displays for the duration of the current day, then it updates to the creation date.
- Click Delete (and Okay) to remove the comment.
Integrations & addons that assign badges
- Zapier integration - This integration has an Award a Badge to a User Action that awards a badge to a user as specified by a Vanilla Trigger. To learn more, see the Vanilla Triggers and Actions section in Zapier Integration.
- Reactions addon – This adds “reaction” options to posts and comments. Badges are available for each of our default Reactions. Badges are awarded for receiving 5, 25, 100, 250, 500, 1000, 1500, 2500, 5000, and 10,000 reactions.
- Q&A addon – This gives users the ability to designate a post as a Question and then mark comments as “accepted” Answers. Users earn a badge the first time their answer marked as an “accepted” answer, and they earn additional badges for providing 5, 25, 50, 100, and 250 “accepted” Answers.
NOTE: Both of these addons have their own settings. Click the settings icon to access the Settings dialog.
Additional resources
Click the link below to access a video expanding on what you learned in this article.