Scoped Tagging is an advanced tagging feature that gives community admins and moderators granular control over which tags are available and visible within specific subcommunities and categories.
This feature is particularly valuable for organizations running diverse subcommunities or categories with unique focuses. With scoped tagging, community managers can ensure tags are only relevant and visible within their intended contexts.
Before we begin…
There are two ways to employ tags in your community: Global Tags and Scoped Tags:
- Global Tags are available for use across your entire community, regardless of category or subcommunity. When Scoped Tagging is OFF, all tags behave as global tags.
Check out our Tags article to learn about our baseline tag functionality.
- Scoped Tags are limited to one or more specific categories and/or subcommunities, available only where they’ve been explicitly scoped. Scoped tags are only possible when Scoped Tagging is enabled. However, when Scoped Tagging is enabled, you can still have both Global and Scoped Tags.
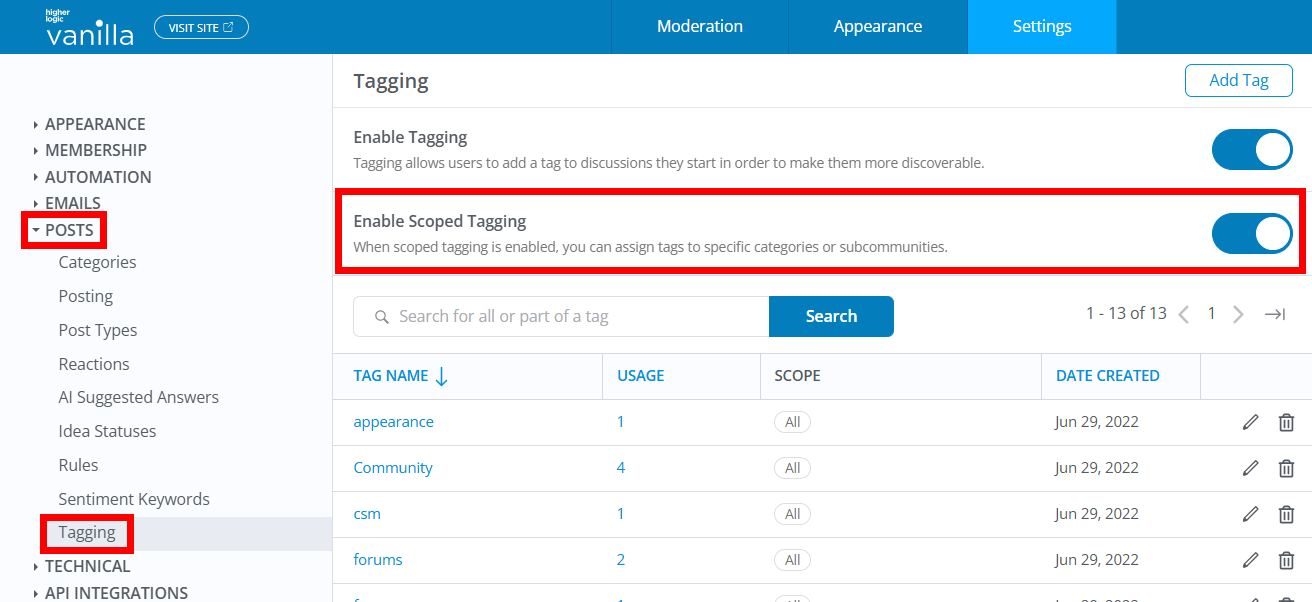
Enable Scoped Tagging
NOTE: Our baseline tag functionality must be enabled before Scoped Tagging can be enabled. Scoped Tagging is not a separate feature: rather, it adds an additional "layer" of functionality on top of the base tagging feature set.
Scoped Tagging is off by default, meaning tags are globally available across your community.
To enable it:
- Access the Dashboard.
- Navigate to Settings > Posts > Tagging.
- Toggle ON the Scoped Tagging feature.
Overview of changes when Scoped Tagging is enabled
- Your existing tags remain globally available, but admins can now manually change their scope to categories and/or subcommunities, if desired.
- A new column called Scope is added to the list, making it easier to see what categories and subcommunities a tag is scoped to.
- Users can no longer create tags inline during post creation: tag creation is now limited to the Tagging page in the Dashboard, as outlined in this article. This is intentional to ensure Admins can scope tags, if needed.
- Users can only select existing scoped/global tags relevant to the posting area (category/subcommunity). For example, a user in the Product X category will see all globally available tags and tags scoped to the Product X category; tags scoped to other categories will not be available to them.
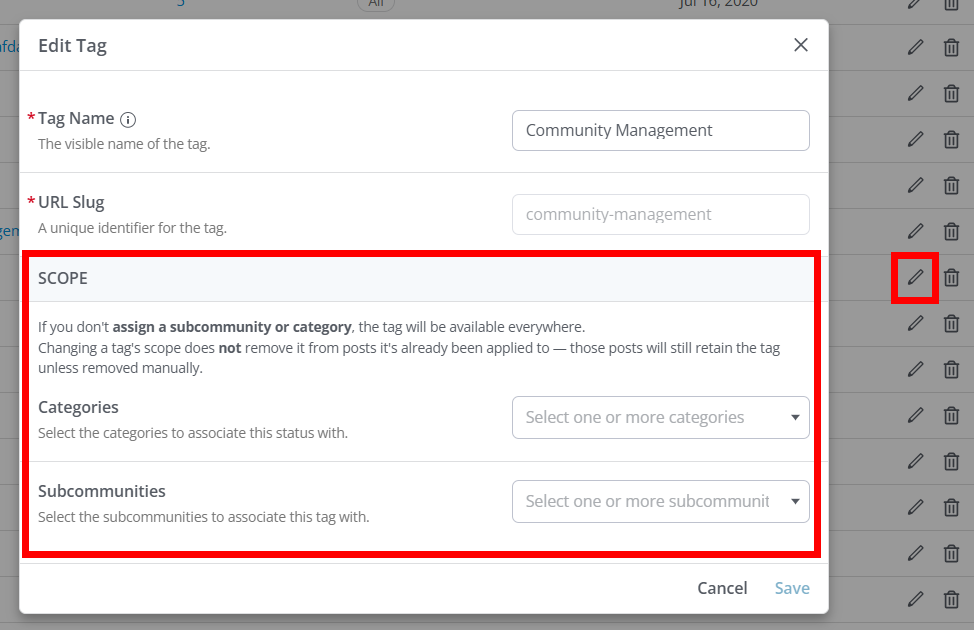
How to scope a tag
With Scoped Tagging enabled, let's walk through how to scope your tags.
- On the Settings > Posts > Tagging page, click a tag's pencil icon to edit it.
- In the resulting dialog, in the Scope section, you can choose which category(ies) and/or subcommunity(ies) to scope the tag to.
- Click Save to apply your changes.
IMPORTANT: When scoping tags, keep the following about inheritance in mind:
Category scoping inherits downward. Tags scoped to a parent category will be available in all its subcategories; scoping to a subcategory propagates to its children, but not up to parents or siblings. If you ever scope a tag to a single category but the list indicates several categories, it's because your selected category AND its associated subcategories are included.
Subcommunity scoping is applied to the selected subcommunity; there’s no “cross” inheritance between different subcommunities.
NOTE: You can only scope to subcommunities if this feature is enabled for your community. Check out our Subcommunities article to learn more.
Identify your scoped tags
Your scoped tags are easy to identify in the list via the Scope column, shown below.
- All: The tag is globally available (not scoped)
- Category(ies): Indicates how many categories the tag is scoped to.
- Subcommunity(ies): Indicates how many subcommunities the tag is scoped to.
NOTE: Click a Category or Subcommunity "pill" to view the specific category/subcommunity the tag is scoped to.

Tagging page filters
With Scoped Tagging enabled, new filtering capabilities are added to the page.
- On the right side of the page, you can check the Scope boxes to limit tags in the list to Global or Scoped.
- When filtering to your Scoped tags, you can further filter them by pinpointing specific categories and/or subcommunities via the Category and Subcommunity options. Click the (+) Add Filter options to select specific categories and/or subcommunities. Once applied, the list will automatically update to reflect your selections.
These filters makes it easy to visualize and manage your Scoped and Global tags.
