Tags are like behind-the-scenes organizers that make it easier to categorize your community content, which, in turn, makes it easier for your users to find. For example, if 15 users tag their content with #2026conference, all 15 pieces of content can be viewed by simply clicking the tag.
When Tagging is enabled, users can add tags to their posts (discussions, questions, ideas, and custom Post Types). This provides several benefits in your community:
- Because all content associated to a tag is automatically grouped and accessible with a single click, it's easier for users to find content relevant to them.
- It allows organizational staff to more easily promote specific content, such as upcoming events, conferences, meetings, etc.
- It improves search engine optimization (SEO) by making it easier for search engines to "crawl" community content.
- It increases the effectiveness of the Advanced Search by allowing searches by tags, which isolates content by relevant topics and improves search results.
Before we begin…
There are two ways to employ tags in your community: Global Tags and Scoped Tags:
- Global Tags are available for use across your entire community, regardless of category or subcommunity. When Scoped Tagging is OFF, all tags behave as global tags.
- Scoped Tags are limited to one or more specific categories and/or subcommunities, available only where they’ve been explicitly scoped. Scoped tags are only possible when Scoped Tagging is enabled. However, when Scoped Tagging is enabled, you can still have both Global and Scoped Tags.
NOTE: This article focuses on global tags; see Scoped Tagging to learn how to enable and manage Scoped Tags.
Enable Global Tagging
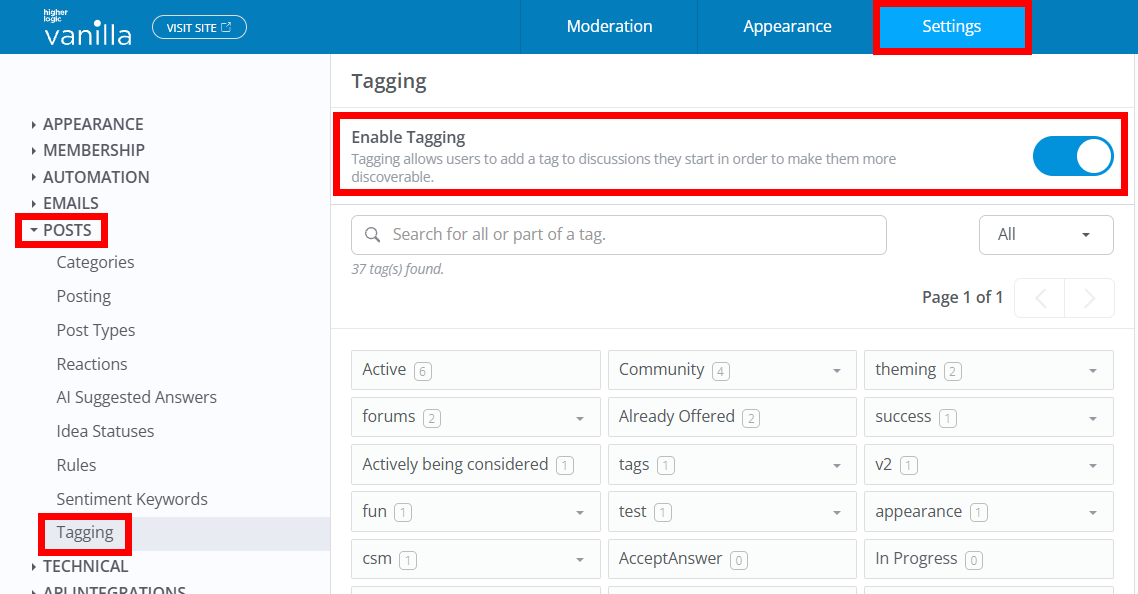
Tagging is not enabled by default; it has to be enabled by an admin.
- Access the Dashboard.
- Navigate to Settings > Posts > Tagging.
- Click the Enable Tagging toggle to turn it ON.
At this point, you can create and apply tags as outlined in this article. If you'd like to enable Scoped Tagging, refer to the section below.
TIP: Append /settings/tagging to your domain to navigate directly to this page.
Enable Scoped Tagging
Scoped Tagging is an advanced tagging feature that gives community admins and moderators granular control over which tags are available and visible within specific subcommunities and categories.
This feature is particularly valuable for organizations running diverse subcommunities or categories with unique focuses. With scoped tagging, community managers can ensure tags are only relevant and visible within their intended contexts.
Check out our Scoped Tagging article to learn how to enable and manage Scoped Tags.
Tag Following
The Tag Following feature allows you to follow tags so you can choose whether to receive in‑app and/or email notifications about new posts that use those tags.
Following your favorite tags makes it easy to keep up with topics and products you care about, without having to follow entire Categories. Even if you don’t enable notifications, all of your followed tags are listed on the Followed Content page, providing quick access to their content.
Check out our Tag Following article to learn how to follow tags and manage their notifications.
Tagging permissions
You have the freedom to control whether all users can create their own tags or limit it to specific Roles.
TIP: Some communities prefer to only allow their admins to create custom tags, resulting in an organization-approved pool of tags.
While editing a Role, check or uncheck the Vanilla > Tagging > Add permission to set that Role's ability to create tags.

NOTE: Even without this permission, users will still be able to tag their posts with existing tags, they just cannot create their own.
Create tags
- Access the Dashboard.
- Navigate to the Settings > Posts > Tagging page.
- Click Add Tag to create a custom tag.
- In the resulting dialog, give it a name and URL slug.
- Click Save.

TIP: Users with the appropriate permission can also add tags to their posts. This action also adds the tag on this page. Refer to the Add a tag to a discussion section below for more information.
Manage tags
On the Dashboard > Settings > Posts > Tagging page, you can create tags and manage existing ones.
- You can see all your existing tags and the number of times each has been used. All of these tags are available for use by your users.
- Click a tag to see its associated content on your community's main Discussions page.
- Click the trashcan icon to delete tags from your community. This action only removes the tag, not its content.
- Click the pencil icon to edit the tag's name and/or its URL slug.

Add a tag to a post
If tagging is enabled, the Tags field is available when creating and editing all post types.
- Click the dropdown to select from any available tags (you can repeat this to select additional tags).
- You can also type in the Tags field; as you type, existing tags will display and you can click one to select it.

TIP: A Popular Tags area displays below the Tags field, making it easy to choose tags that are popular in your community.
How many tags can be added to a post?
You can choose to configure a minimum and maximum number of tags that are required, per post, in your Posting Settings.
View tags in the community
Let's take a look at what happens when a user clicks a tag in your community.
NOTE: The main thing to understand here is that the page a user is navigated to upon clicking a tag changes depending on whether your community is configured to use Legacy Discussion Layouts or Custom Discussion Layouts:

Custom Discussion Layouts
If using a custom discussion layout, clicking a tag displays its Tag Card, from which you can click:
- the Posts button to view your community's Recent Posts page filtered to the tag;
- the Groups button to view a list of Groups that use that tag, filtered to that tag and limited to Groups you have permission to see;
- the Follow button to follow the Tag. Learn more in our Tag Following article.

Legacy Discussion Layouts
If using a legacy discussion layout, users will navigate to your community's search page, with the clicked tag selected to show its associated content.
