In this article, you'll learn how to configure Vanilla's JsConnect addon to perform Single Sign On (SSO) to your Vanilla community from your website. Vanilla's JsConnect is our in-house SSO addon that interfaces with your authentication application by making signed requests/responses sent as GET parameters in JSON Web Token.
If you are using JsConnect but are not using V3, we recommend that you switch as soon as possible. To do so, you'll need to upgrade the code on your authentication application first. You can build your own authentication application or install one of our libraries, if you use a programming language we support.
- For more information, and for a link to our libraries, see this article.
📝 NOTE: This article explains how to configure the JsConnect addon in the Vanilla Dashboard only; for configuring the authentication application, follow the instructions in the README of the library you choose to install.
Anatomy of the JsConnect addon
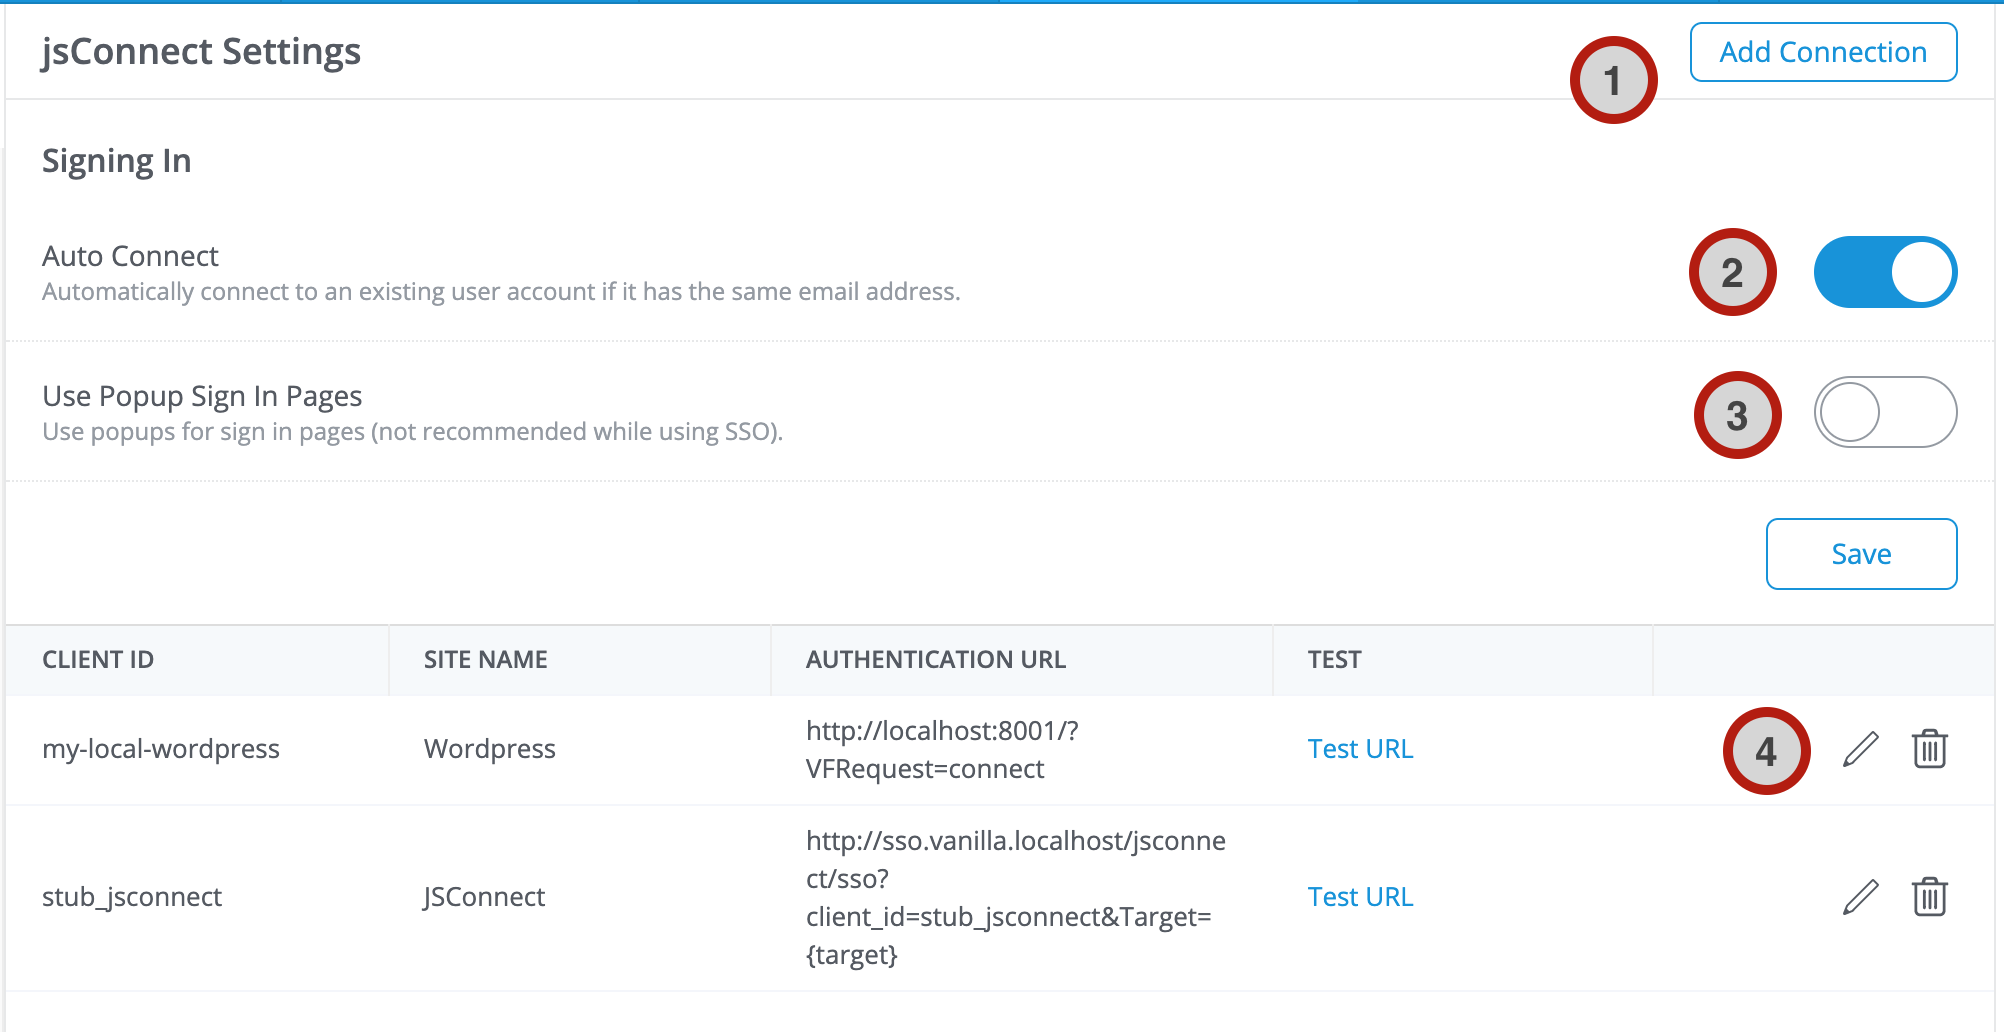
- Add Connection - You can have multiple buttons that connect to different applications, thereby allowing users to log in from different JsConnect authentication applications.
- Auto Connect - This setting allows you to automatically connect a user that you pass over in the SSO response to a user that already exists in your community. What does this mean? Let's say I register directly in the community with my email,
willy@chocolatefactory.com. I have created a display name and have even posted some content. I then notice there's a button to sign in through your site, where I also have a membership. When I sign in through your site and am redirected to the community (with the signed response and my user data), the community finds that willy@chocolatefactory.com already exists and knows it's me from my earlier registration. If Auto Connect is turned on, the community will trust that I am the same willy@chocolatefactory.com , and I will be logged in as such. If Auto Connect is turned off, it will not assume that willy@chocolatefactory.com is me, it will prompt me to put in the correct password for that user in order to prove that it is. - Use Popup Sign In Pages - Toggle this on if you want a small dialog to open on the page with the sign in form. If you're using JsConnect as your default method of signing in, we recommend that you turn this off, as it will just open the dialog and then redirect you. You will definitely want this set to off if you're using Vanilla to embed comments, or if you're embedding the whole community in an iframe.
- Edit, Delete or Test a Connection. Since you can have multiple connections, you're free to edit them or delete them. Testing the connection will make a request to the Authentication URL you have configured and show you the response.
Configuration
The configuration form of a connection is simple. However, here are some elements that might require an explanation:
- Client ID - The name of the authentication application on your site.
- Secret - The string shared between the authentication application on your site and Vanilla, used to sign requests.
- Site Name - The name of the site or application that the user will sign in from. If you have multiple methods to sign in, this will appear on the button for this connection. If I want employees to log in from one connection, then I would put "Employee Sign In" here.
- Authentication URL - The endpoint on the authentications application on your site that handles the logic of logging in users. Append this URL with
&Target={target} or ?Target={target} in order to allow our system to return the user to the page where they were when they clicked Sign In. If I click Sign In when I'm on /discussion/16/any-suggestions our system will literally string-replace {target} with %2Fdiscussion%2F16%2Fany-suggestions and pass it along to your authentication server as &Target=%2Fdiscussion%2F16%2Fany-suggestions. When the user is authenticated and sent back to the community with that Target parameter still intact, we will redirect them to where they were. - Sign In and Registration URLs - These URLs are where you want users directed to when they sign in or register. Append these URLs with
&Target={target} or ?Target={target} in order to allow our system to return the user to the page where they were when they clicked Sign In. If I click on Sign In when I'm on /discussion/16/any-suggestions , our system will string-replace {target} with %2Fdiscussion%2F16%2Fany-suggestions and pass it along to your authentication server as &Target=%2Fdiscussion%2F16%2Fany-suggestions. When the user is authenticated and sent back to the community with that Target parameter still intact, we will redirect them to where they were. - This is a trusted connection and can sync roles & permissions - All of Vanilla's SSO methods support passing and assigning Roles as part of the connection process. If the authentication server is controlled by you, you can trust that if it passes a Role that we can assign it to the user. If not, toggle this off. By default Vanilla will re-assign the user's Roles every time they log in over SSO, giving your authentication provider full control over the user's Roles. Cloud customers who want to be able to assign roles to users in the Vanilla Dashboard and have roles added over SSO can ask Vanilla Support to configure their community to work this way. For more details on passing roles over SSO, see this article.
- Make this connection your default signin method - If you only want users logging in registering on your authentication server, toggle this on. This has multiple benefits.
- There will not be multiple buttons or a form to sign in.
- When a user clicks on sign in he/she is sent directly to your sign in page.
- If your forum is in Private Mode, instead of landing on the community, users will be redirected to the sign in page on your site if they are not already signed in.
- You can use the convenient
/sso endpoint to connect users seamlessly from your application to the community. This means that on your site you can create links to the community that are like https://you-forum.yoursite.com/sso and if your user is logged in on your site they will be logged in on the community. They will not have to click Sign In to start posting in the community.
- Test Mode - Ignore this if you're using Version 3.
- Protocol - This should be set to Version 3. Version 2 is based on making Ajax requests and passing cookies over those requests. Most browsers will now reject those cookies.
Troubleshooting
For testing and troubleshooting, see this article.