Custom pages are fully configurable standalone pages that you can build from scratch, independent of Vanilla’s core page layouts (like Category, Post, or Knowledge Base pages).
Custom pages are built using Layout Editor, which lets you easily assemble them with two key components: Sections, which control the page layout, and Widgets, to display dynamic or static content.
Each custom page can be given a unique name and URL, set visibility by user Role or Rank, and built to meet your community's unique and ever-evolving needs, such as branding, navigation, campaign landing, onboarding, or informational. Unlike modifying existing community layouts, Custom Pages let you create original pages within your community, expanding engagement and supporting custom user journeys or special events.
Before we begin…
It's important to not confuse custom layouts with custom pages.
- Vanilla also allows you to create custom layouts, but these are limited to specific pages, such as Home pages, Category pages, and Post pages, and are based on templates that are not fully customizable, as certain core elements are required.
- On the other hand, custom pages are completely independent and 100% fully customizable from top to bottom.
Should I build a custom page or a custom layout?
When deciding between a custom layout or a custom page, consider whether you need to modify the look and structure of core community pages or create brand new, standalone pages.
- Build a custom page when you need an entirely new, standalone page that isn’t tied to Vanilla's core layouts. Custom pages are best for special purposes, such as campaign landing pages, informational or resource centers, onboarding hubs, event promotions, or custom navigation destinations. These pages start blank, can be structured with any layout or widget combination, assigned their own URL and permissions, and are not restricted by the mandatory layout and content of core community layouts.
- Build a custom layout when you want to change the structure, content arrangement, or widgets for existing core Vanilla pages (like Home, Category, Discussion, Knowledge Base, Events, etc.). Custom layouts let you tailor the appearance and many of the components shown on these standard page types. Build a custom layout if your goal is to improve the design or user experience of pages that are already part of Vanilla’s core navigation and user flows. See Overview of Custom Page Layouts to learn more.
Access your custom pages
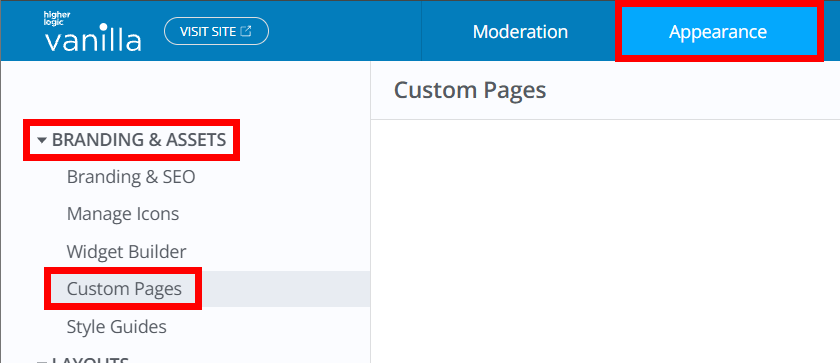
- Access the dashboard.
- Navigate to Appearance > Branding & Assets > Custom Pages.
Create a custom page
Creating a custom page is a multi-step process.
Step 1 - Create the page and define its details
To begin, click Create Page to display a dialog to define your page's high-level details and configuration settings.
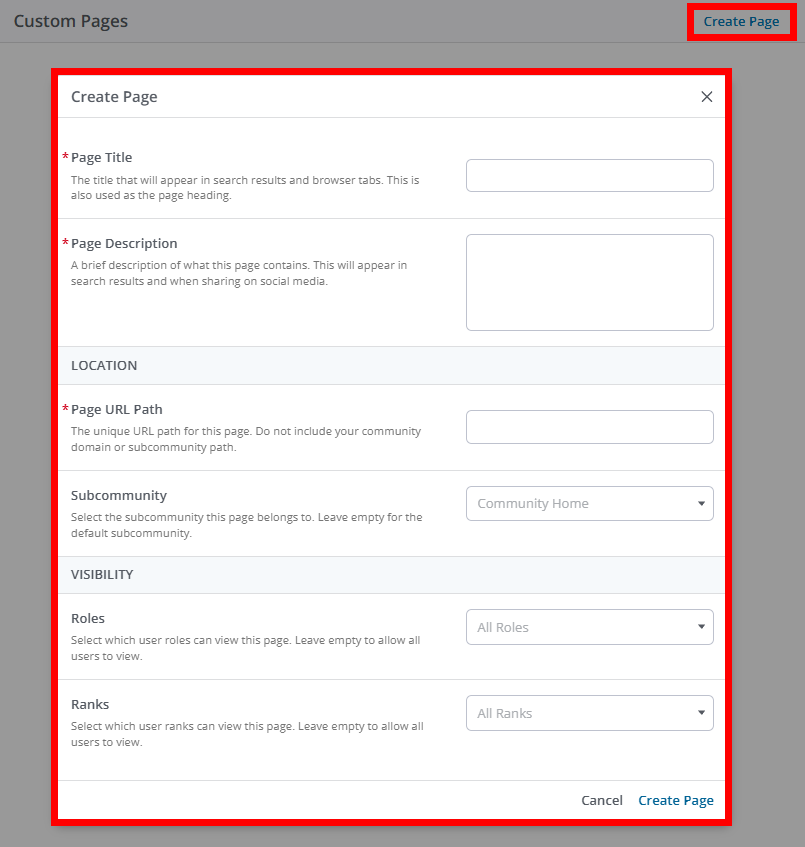
Each option is described below.
- Page Title: This title text displays in search results and browser tabs, and is also used as the page title displayed on the page itself.
- Page Description: Write a brief description about the page and its purpose. This description text does not display on the page but in search results and when sharing on social media.
- Page URL Path: Define the page's URL path, without including your community domain or subcommunity path. For example, if my community domain is
success.vanillaforums.com and I set my page's URL path as custompage, it will automatically resolve as success.vanillaforums.com/custompage. - Subcommunity: If your organization uses subcommunities and you want your page to belong to a specific subcommunity, select it here.
- Roles: Optionally define which Roles can view the page.
- Ranks: Optionally define which Ranks can view the page.
NOTE: Leave the Roles and/or Ranks selection blank to make the page available to ALL Roles and/Ranks.
When these details are configured, click Create Page to move to step 2 of the process.
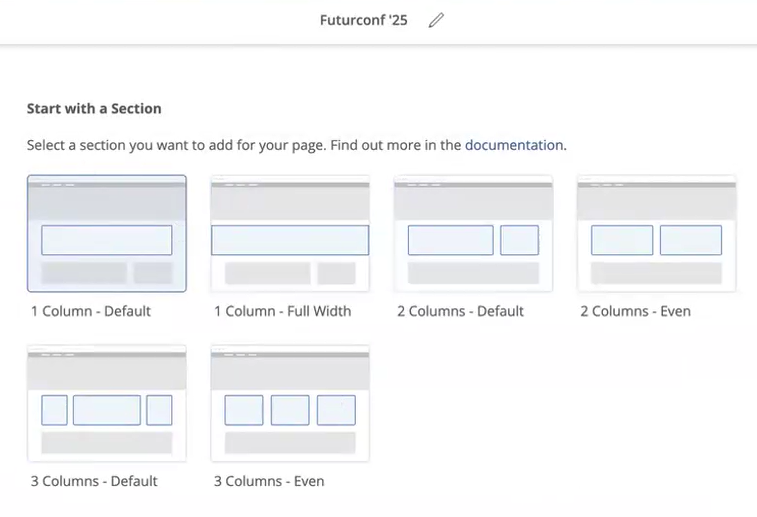
Step 2 - Use Layout Editor to customize page layout & content
You're now viewing a blank canvas in Layout Editor, and are presented with several Section types.
- Select your first Section to begin defining your page's layout. Clicking a Section immediately adds it to the layout.
2. At this point, you can continue adding additional Sections to complete the layout of your page and then add Widgets to these sections to define their content. Content can be anything from calls to action, discussion lists, event lists, and leaderboards to custom HTML, CSS, and JavaScript.
3. When your page is complete, click Save at the top right of Layout Editor to create it, making it manageable from the main list page.
Manage your custom pages
All of your created custom pages are listed on the Custom Pages list page, and can be managed using the following options, located to the right of each page (discussed left to right):
- Click the toggle to set a page's state to active and inactive. Only active pages are visible to your users, while admins can view inactive pages to allow for content previewing prior to publishing.
- Click the pencil icon to edit the page's Sections (layout) and Widgets (content) in Layout Editor.
- Click the gear icon to edit the page's details and configuration settings (title, URL, visibility, etc.).
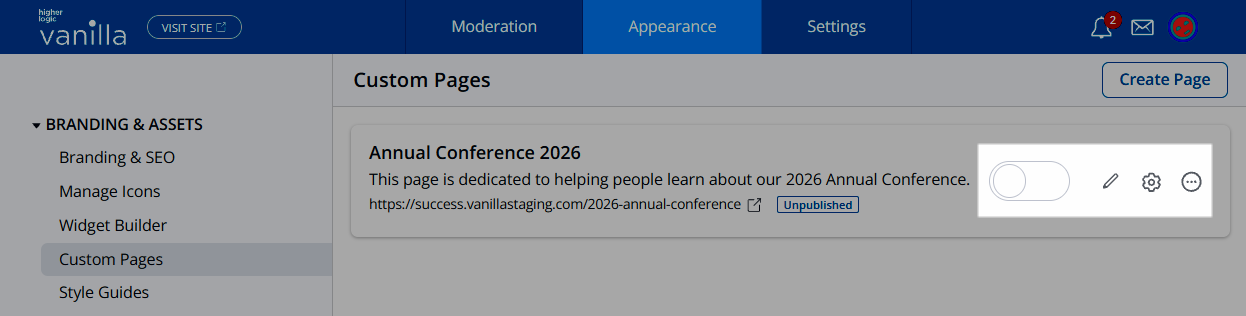
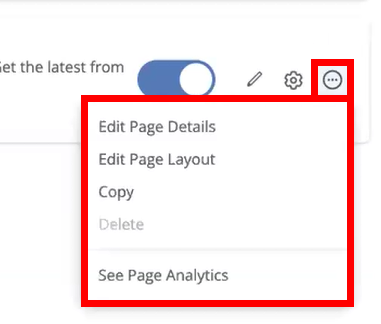
Click the ellipsis (…) menu to access three additional options:
- Copy a custom page. Copied pages retain their layout and content but require you to fill out their details and settings.
- Delete a custom page. You can only delete pages in the inactive state.
- See Page Analytics to open a new browser tab that displays an analytics dashboard for the selected custom page. This dashboard allows you to view:
- the total page views charted over time,
- the specific users who have viewed the page, along with how many times each user has viewed the page,
- and the specific traffic sources generating page views (e.g., you can add custom UTM parameters to your links to understand where traffic to a custom page originates from).
Retrieve your custom page URLs
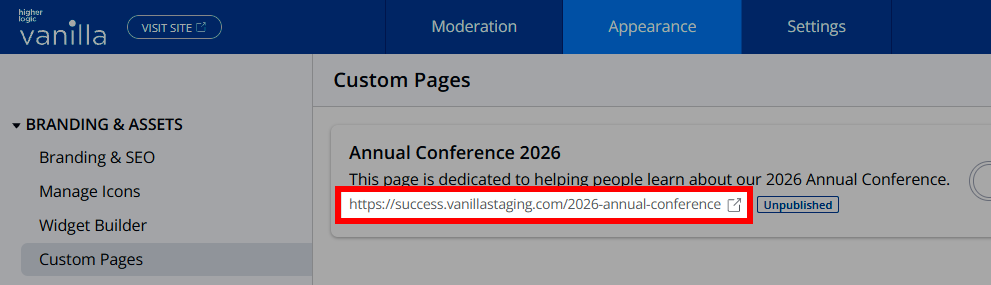
On the Appearance > Branding & Assets > Custom Pages list page, all of your custom pages are available.
- Below each page is its dedicated URL, which you can click at any time to view it in a separate browser tab.
- Admins can even view unpublished pages, making it easy to review them before making them public.
- Insert this URL across your Vanilla community where you'd like to use and share your custom pages.