Best Of
If the Answer Helped, the Community Helped
Hey everyone!
I’ve been thinking a lot lately about how I personally find answers now.
More and more often, I catch myself asking an AI tool before I go to Google. And internally, I use our Vanilla MCP all the time instead of manually searching through the Success Community first.
But here’s the important part: that does not mean I’m getting less value from the community.
It means I’m getting value from the community differently.
The answer may still come from community knowledge. It may still be based on a discussion, a documentation post, a Tip Tuesday, a product explanation, or something another person took the time to write down and share.
I just might not be consuming it by clicking into the community directly.
And I do not think I’m alone in that behavior shift. 😊
The Goal Is the Knowledge, Not Always the Visit
Every community has its own goals.
Some communities are focused on peer connection. Some are focused on advocacy. Some are focused on support deflection. Some are focused on product feedback, education, or belonging.
For the Success Community, one of my biggest goals is pretty simple: I want people to know about Vanilla and understand how to use it well.
Of course I love when people come directly into the community, engage with posts, ask questions, and help each other. That still matters a lot (and is fun!)
But if someone gets a helpful Vanilla answer through search, an AI assistant, an internal tool, or another vector that was informed by community content, I still see that as community value.
➡️ The member got closer to the answer.
➡️ The product became easier to understand.
➡️ The knowledge did its job.
That is the piece I think we need to get better at measuring.
Pageviews Still Matter, but They Are Not the Whole Story
For a long time, pageviews have been one of the easiest ways to understand whether community content is being used.
And they are still useful!
They tell us when people are visiting, reading, searching, and engaging directly.
But the way people find answers is changing. Search engines are answering more questions directly. AI assistants are summarizing information before someone clicks through. Bots and crawlers are consuming content in ways that may not look like a normal member visit.
So if we only look at pageviews, we may accidentally undercount the actual reach and usefulness of the knowledge our communities are creating.
This is especially important for support and product communities.
If someone asks an AI assistant a question and the answer is informed by your community content, that may still reduce friction. It may still prevent a support ticket. It may still help someone move forward.
It just may not show up as a traditional community visit.
Community as a Knowledge Engine
This is why I like thinking about community not only as a destination, but as a knowledge engine.
Your community is where real people ask real questions, share real experiences, solve real problems, and create practical knowledge that can help the next person.
That knowledge can support:
- Members who visit the community directly
- Search engines indexing your content
- AI crawlers discovering useful information
- AI assistants fetching content to answer questions
- Internal teams looking for trusted product context
- Customers trying to self-serve before opening a ticket
The destination still matters.
But the value is not limited to the destination anymore.
Why This Conversation Is Happening Now
This is not just a community-platform thing. It is part of a much bigger shift in how people find information online.
A few examples:
- SparkToro and Datos reported that only 360 out of every 1,000 Google searches in the U.S. resulted in a click to the open web.
- Gartner predicted that traditional search engine volume would drop by 25% by 2026 as AI chatbots and virtual agents become more common.
- Cloudflare reported a growing gap between how often AI crawlers consume content and how often they send traffic back. In June 2025, Cloudflare reported Google crawled about 14 pages per referral, while OpenAI’s crawl-to-referral ratio was 1,700:1 and Anthropic’s was 73,000:1.
- Seer Interactive has been tracking how Google AI Overviews are changing click-through behavior from search results.
The details will keep changing, but the larger pattern is pretty clear: people and machines are consuming content in more ways than our old reporting models were built to capture.
Where the New Bot and AI Traffic Filters Come In
This is where the new bot and AI traffic filters in Vanilla Analytics become really useful.
The filters are not the headline by themselves.
The headline is that community value is getting more distributed, and we need better ways to see how community knowledge is being consumed.
The new filters are one way to start doing that.
In Analytics, you can now filter dashboard data by traffic type, including:
- Human User — real people visiting your community
- Search Engine Crawler — bots indexing content for search results
- AI Crawler — bots crawling content that may be used by AI tools or datasets
- AI Assistant — bots fetching content to help answer user questions in real time
- Archiver — bots preserving snapshots of web content
- Likely Automated — automated traffic that does not match a known bot operator
You can read more about these filters in these posts:
This helps separate different kinds of activity instead of treating every pageview as the same thing.
A human visitor, a search crawler, and an AI assistant are all signals.
They just tell us different things.
A Quick Example from the Success Community
Here is an example from the Success Community.
When we look at Page Views by Traffic Type, we can see human activity, search crawler activity, AI crawler activity, AI assistant activity, and other automated traffic separated out:
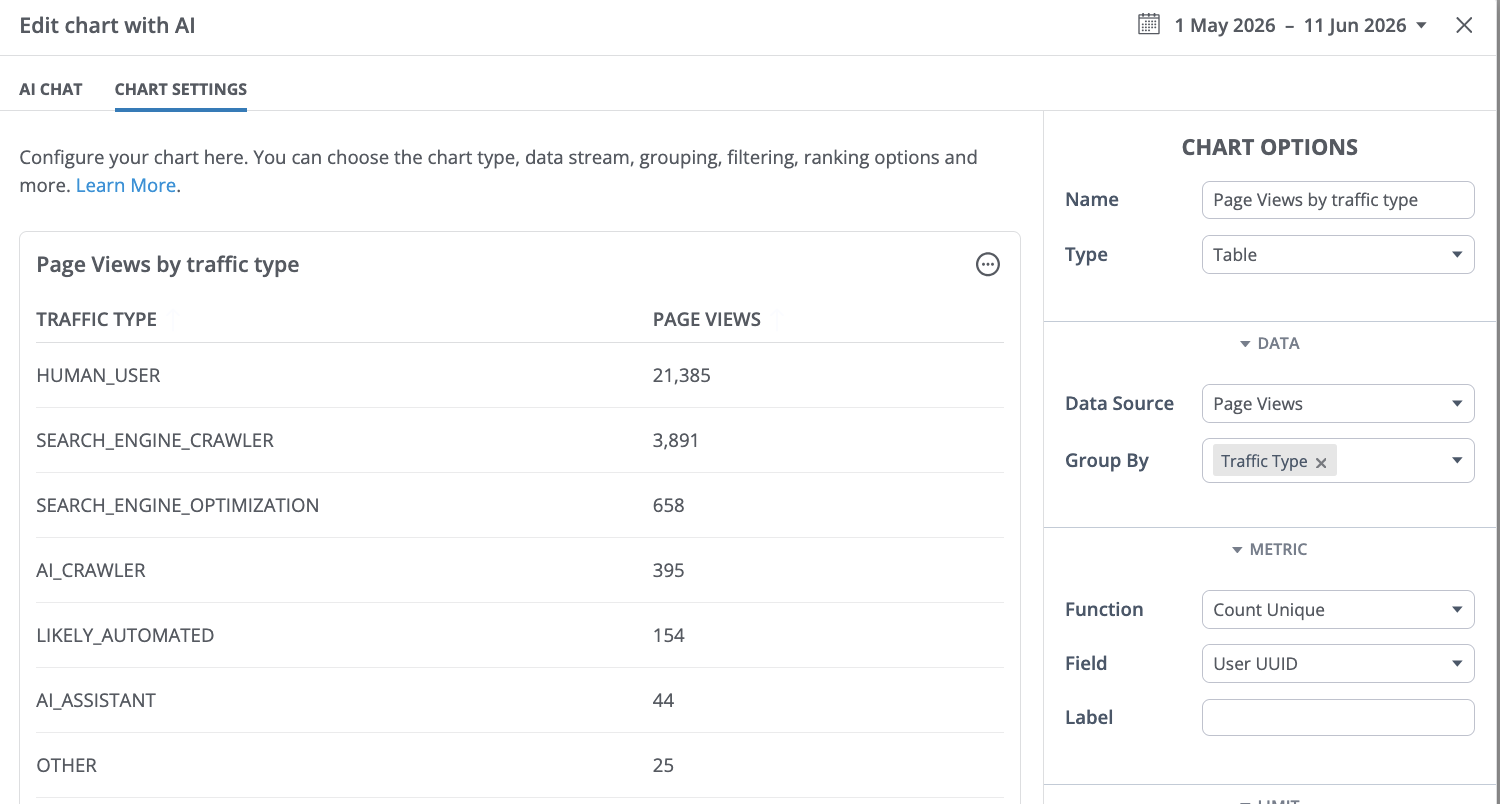
That immediately gives us a better reporting conversation.
Instead of only asking:
“Are pageviews up or down?”
We can ask:
“How much of this activity is from people?”
“How much is search-related?”
“Are AI crawlers consuming certain parts of the community?”
“Which pages are AI assistants fetching?”
That last question is especially interesting to me.
In the Page Views by AI Assistant chart, we can see specific Success Community pages touched by AI assistant traffic, including Tip Tuesday posts, community management resources, product education content, technical discussions, and posts about AI bots.

That feels meaningful.
Not because every AI Assistant pageview automatically equals ROI. It does not.
But because it shows that practical, answer-oriented community content is being picked up in these newer answer paths.
That is exactly the kind of content communities are so good at creating.
How I’d Think About This in Reporting
I would not use AI traffic as a standalone ROI model.
An AI Assistant pageview does not automatically mean a support ticket was deflected.
But I would absolutely treat it as a useful signal.
A few ways I’d use this data:
Look at human traffic separately from automated traffic
This helps you understand what reflects direct member behavior versus search, AI, or other automated activity.
Review AI Assistant traffic by page
This can show which pieces of content are being fetched by AI assistants. Then you can ask: is this content current, accurate, and helpful?
Review AI Crawler traffic by category
This can help identify which areas of your community are being consumed by AI-related crawlers.
Pair traffic type data with content health
The value story gets much stronger when you look at these filters alongside accepted answers, answered questions, content freshness, top support topics, and high-value knowledge areas.
Use it as an executive conversation starter
If pageviews are flat or down, these filters can help explain that direct visits are only one part of the value story. Community content may still be supporting search visibility, self-service, AI-mediated answers, and product education.
A Note on Referrer and UTM Data
You may also see AI-related activity show up in referrer or UTM reporting.
That can be useful, but I would treat it as directional.
Referrer and UTM data can be inconsistent depending on how the visit was passed, whether the source includes referral information, whether links were tagged, and how privacy settings or redirects behave.
For this specific use case, the bot and AI traffic filters are the cleaner place to start.
The Bigger Point
For me, this all comes back to one thing:
Did the community help someone understand the product, solve a problem, or move forward?
If yes, that is value.
Sometimes that value looks like a pageview.
Sometimes it looks like a solved discussion.
Sometimes it looks like a support ticket that never had to be created.
And increasingly, it may look like community knowledge being used through search, AI, internal tools, or other answer experiences.
That does not make the community less important.
It makes the quality of the community’s knowledge even more important.
Fresh answers matter.
Accepted solutions matter.
Clear titles matter.
Healthy categories matter.
Good community management matters.
Because your community’s impact may reach farther than the pageview.
I’d Love to Hear From You
Are you starting to look at bot or AI-related traffic in your community reporting?
Have you changed how you talk about pageviews, deflection, or content value with your team?
And when you look at these filters in your own dashboard, are there any surprises in what content is being crawled or fetched?
Drop your thoughts below. I think this is one of those areas where community teams are going to learn a lot from each other as the measurement story keeps evolving. ✨
Sources and Further Reading
A few sources that helped shape this post:
 Shauna
#TipTuesday: Mark an Accepted Answer when your question is solved
Q&A is one of the most commonly used features in many communities. Members rely on it to ask questions, get help, and learn from others who may have run into the same situation.
Because Q&A is so active, it is worth the occasional reminder: when a question has been answered, marking an Accepted Answer helps turn that discussion into a clear, reusable resource for everyone.
Have you ever searched the community, found a discussion that matched your question, and then had to scroll through every reply to figure out which answer actually worked?
When you ask a question in the community and another Member or Moderator shares the solution, you can mark that reply as the Accepted Answer. This lets everyone know, “This is the response that solved it.”
How to mark an answer as accepted:
- Go to the question you posted.
- Review the replies and find the response that best answers your question.
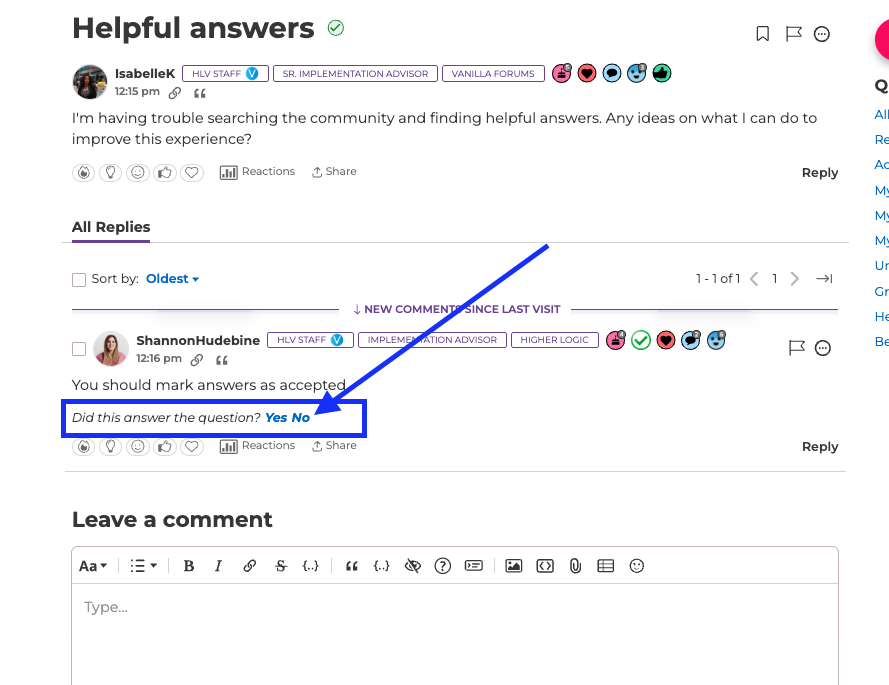
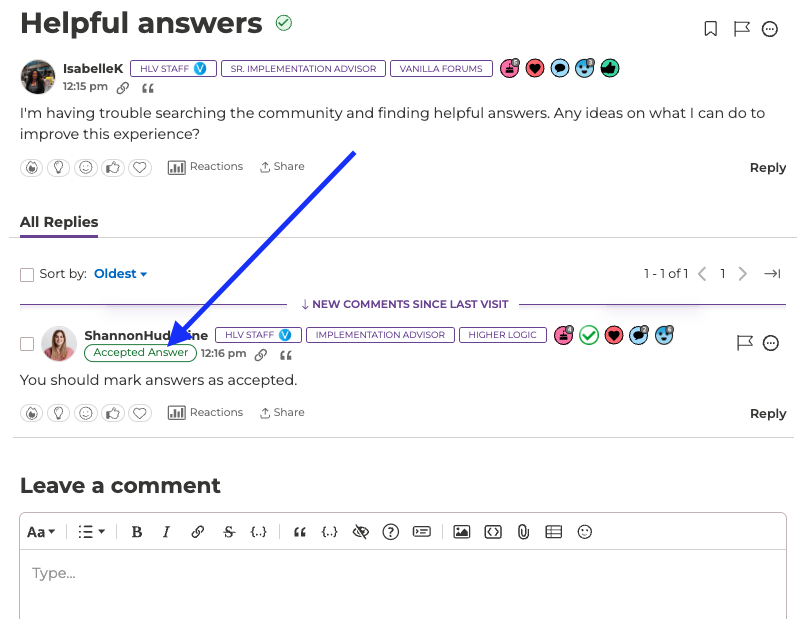
- When you select “yes”, the answer will be marked as “Accepted” so other members can quickly identify the solution.
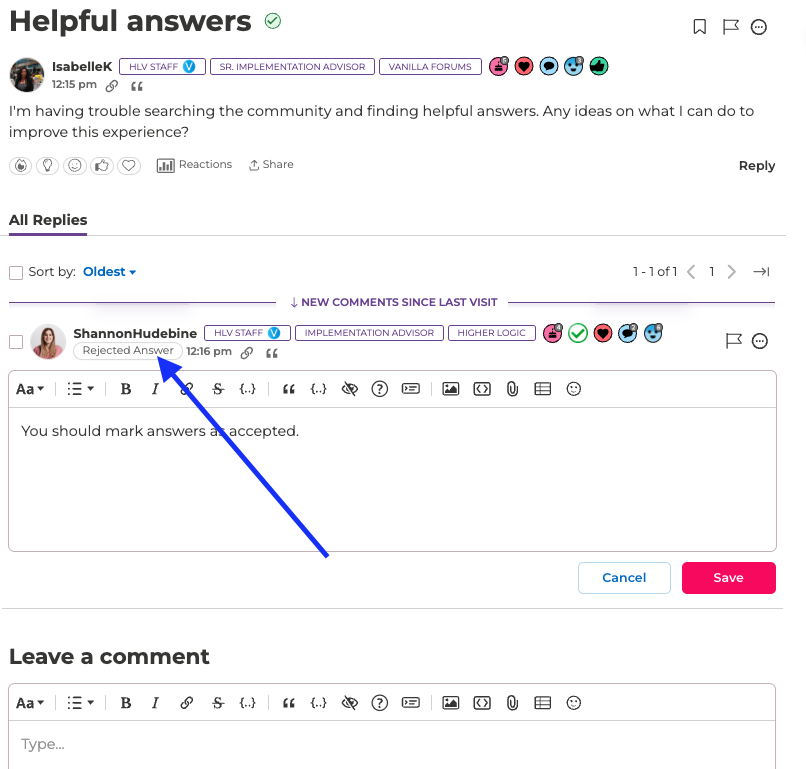
- If you select “No”, the answer will be marked as “Rejected”.
You can also use Accepted Answers as part of your community’s recognition strategy. In your community Settings page, you can configure additional points for answers that are marked as accepted, giving members an extra incentive to share helpful, solution-focused responses.
In Settings →Add-ons list, find “Q&A”. You can then add points for every answer and additional points for accepted answers.

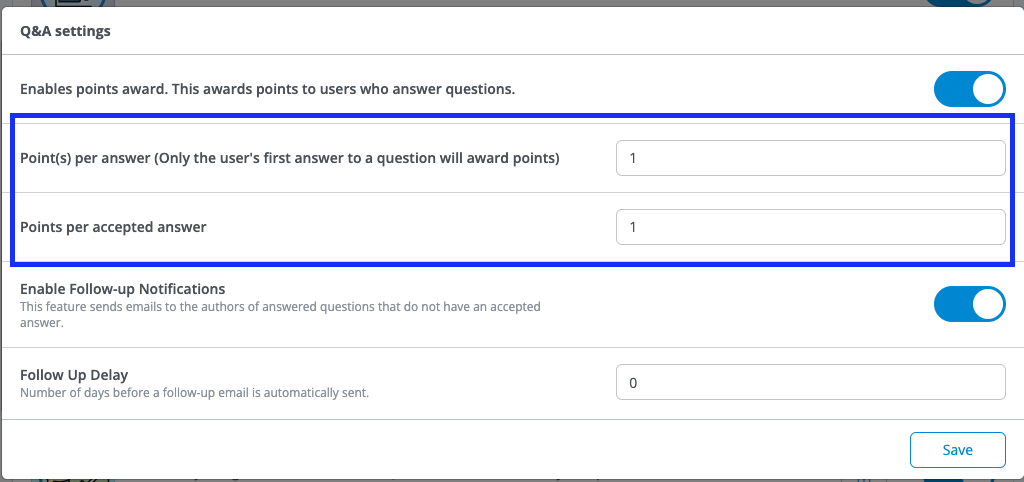
To help your community users with this, you should enable the Follow Up options as well, which would send users and a reminder to go back and mark one of the provided answers as accepted.
Marking an Accepted Answer helps:
- Other members find the right solution faster
- Future search results become more useful
- Helpful contributors get recognized
- The community stays cleaner and easier to navigate
It only takes a moment, but it can save community users a lot of time later.
If you’ve posted a question recently and received a helpful reply, take a minute to go back and mark the best response as the Accepted Answer.
Have you ever found a solution faster because someone else marked an Accepted Answer? Share your experience in the comments.
