Schedule
Release 2021.012 will be deployed:
- To staging sites, Tuesday, June 15th
- To production sites, Monday, June 21st
- To Enterprise client sites, Monday, June 28th
Machine Translation for Knowledge Base
Knowledge Base users can now use Machine Translation services to translate KB articles.
In order to use this feature, you will need to have a multi-lingual Knowledge Base enabled, and be subscribed to one of our available service providers - Google Translate or DeepL Translator.
Getting started:
To get started, visit the new Language Settings page in your Dashboard settings, this page replaces what was previously called our "Locales" page. Here you can enable the language packs you would like to use, set your default language for the site, and configure Machine Translation for your KB.

Configuring Google Translate
To configure Machine Translation you will need a Google Translate API key. Once you have this, go to the Machine Translation tab and edit Google Translate, and enter your API key:

Configuring DeepL Translator
To use DeepL, you will need to have a DeepL API Pro account. To enable the optin submit a request to our Support team or via your CSM to have this enabled. Once enabled you can configure this service using your DeepL Translator API Key. DeepL offers more advanced configuration options so you can add:
- Words to ignore while translating
- HTML/XML tags to ignore while translating
- HTML/XML tags to cause splits

Once you've configured your service provider(s) you then have the option to configure which service to use per language. Go back to the Localization Tab and edit your enabled Language Packs and select the service provider you would like to use. Choose "None" if you do not wish to use Machine Translation for a specific language and you'd like to manually translate your content.

Translating Articles
Now that Machine Translation is set up, you can start translating articles.
- Go to your KB, and find an article you would like to translate.
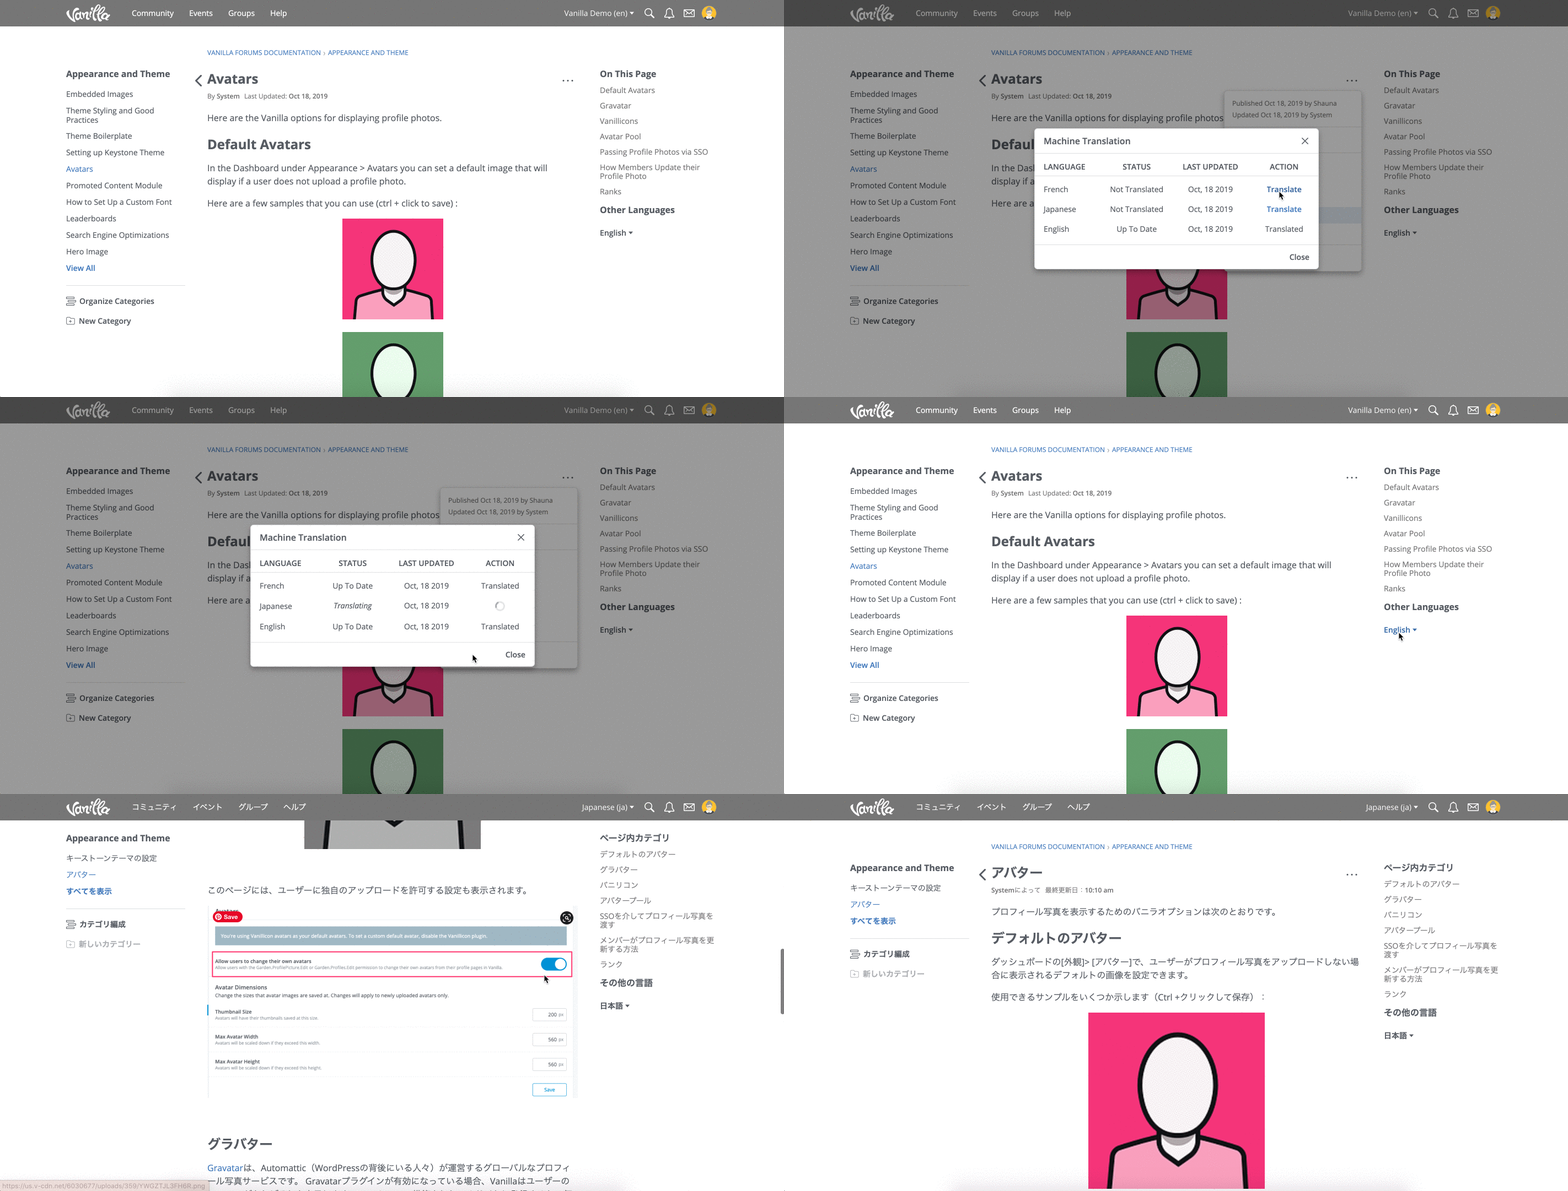
- In the Options menu, select "Machine Translation" this will launch a modal.


The modal will show you all the languages you have configured for this KB, and the articles translation status for each.
- Not Translated indicates the article requires translation to be made available in that language.
- Up to date indicates the article has been translated and is aligned with the source locale
- Out of date indicates the article has been translated in the past, but the source locale has a recent update that may not be reflected in the translation.
To translate an article that is Not Translated or Out of Date, click the "Translate" action button. Once the article has finished translating it will automatically be published.

Private Profiles
Community Members and Admins can now mark profiles as "Private" in order to restrict profile access to authorized users such as Community Managers and Administrators.
Enabling Private Profiles:
To mark a profile as private users can edit their profile and enable the "Private Profile" setting. Administrators and Community Managers can also enable Private Profiles for users by editing their profiles.

You can also choose to enable the Private Profile setting for Banned User accounts by default, by enabling Private Profiles in your Dashboard's Moderation tab under "Ban Rules." Click the new settings button in the top right-hand corner to launch the settings modal:

What happens when a profile is private?
When a user's profile is private:
- Users must have the PersonalInfo.View permission to gain access to the users profile page. Users without
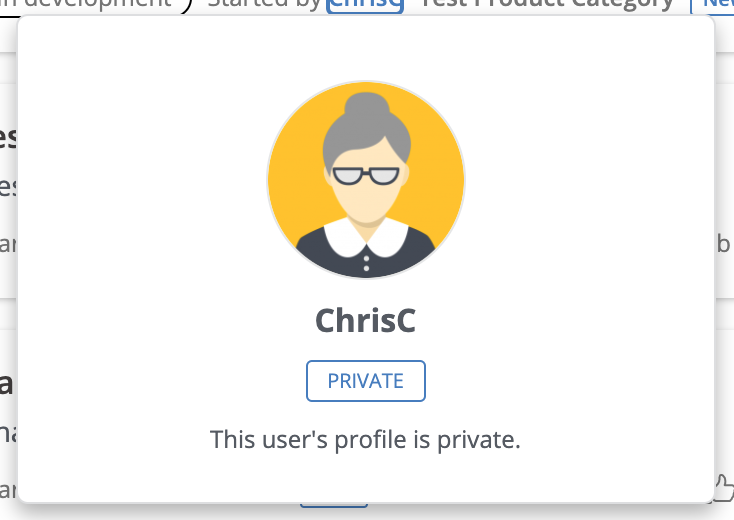
- If you are using Foundation or our UserCard feature we will show a modified view of the usercard to unauthorized users that omits profile details as well as the View Profile and Message buttons, only showing the user's avatar and username.

This setting only restricts access to the user profile. It does not:
- Remove users from Member Search
- Prevent users from messaging the user
Event Search
With this release, we've added Events to search. Users can now surface events in their search results.
These will be included when searching through All content, or you can use the Events search tab to search through events specifically using advanced filters.

Award Badges with Zapier
We've added a new Action to our Zapier app to allow you to award badges in Vanilla based on specific triggers. Here are some example use cases:
Award a badge to community members who complete your Skilljar courses.
If I'd like to award community members a badge when they complete a course in Skilljar, I can do this by:
- Creating a new badge in my Vanilla Dashboard Settings
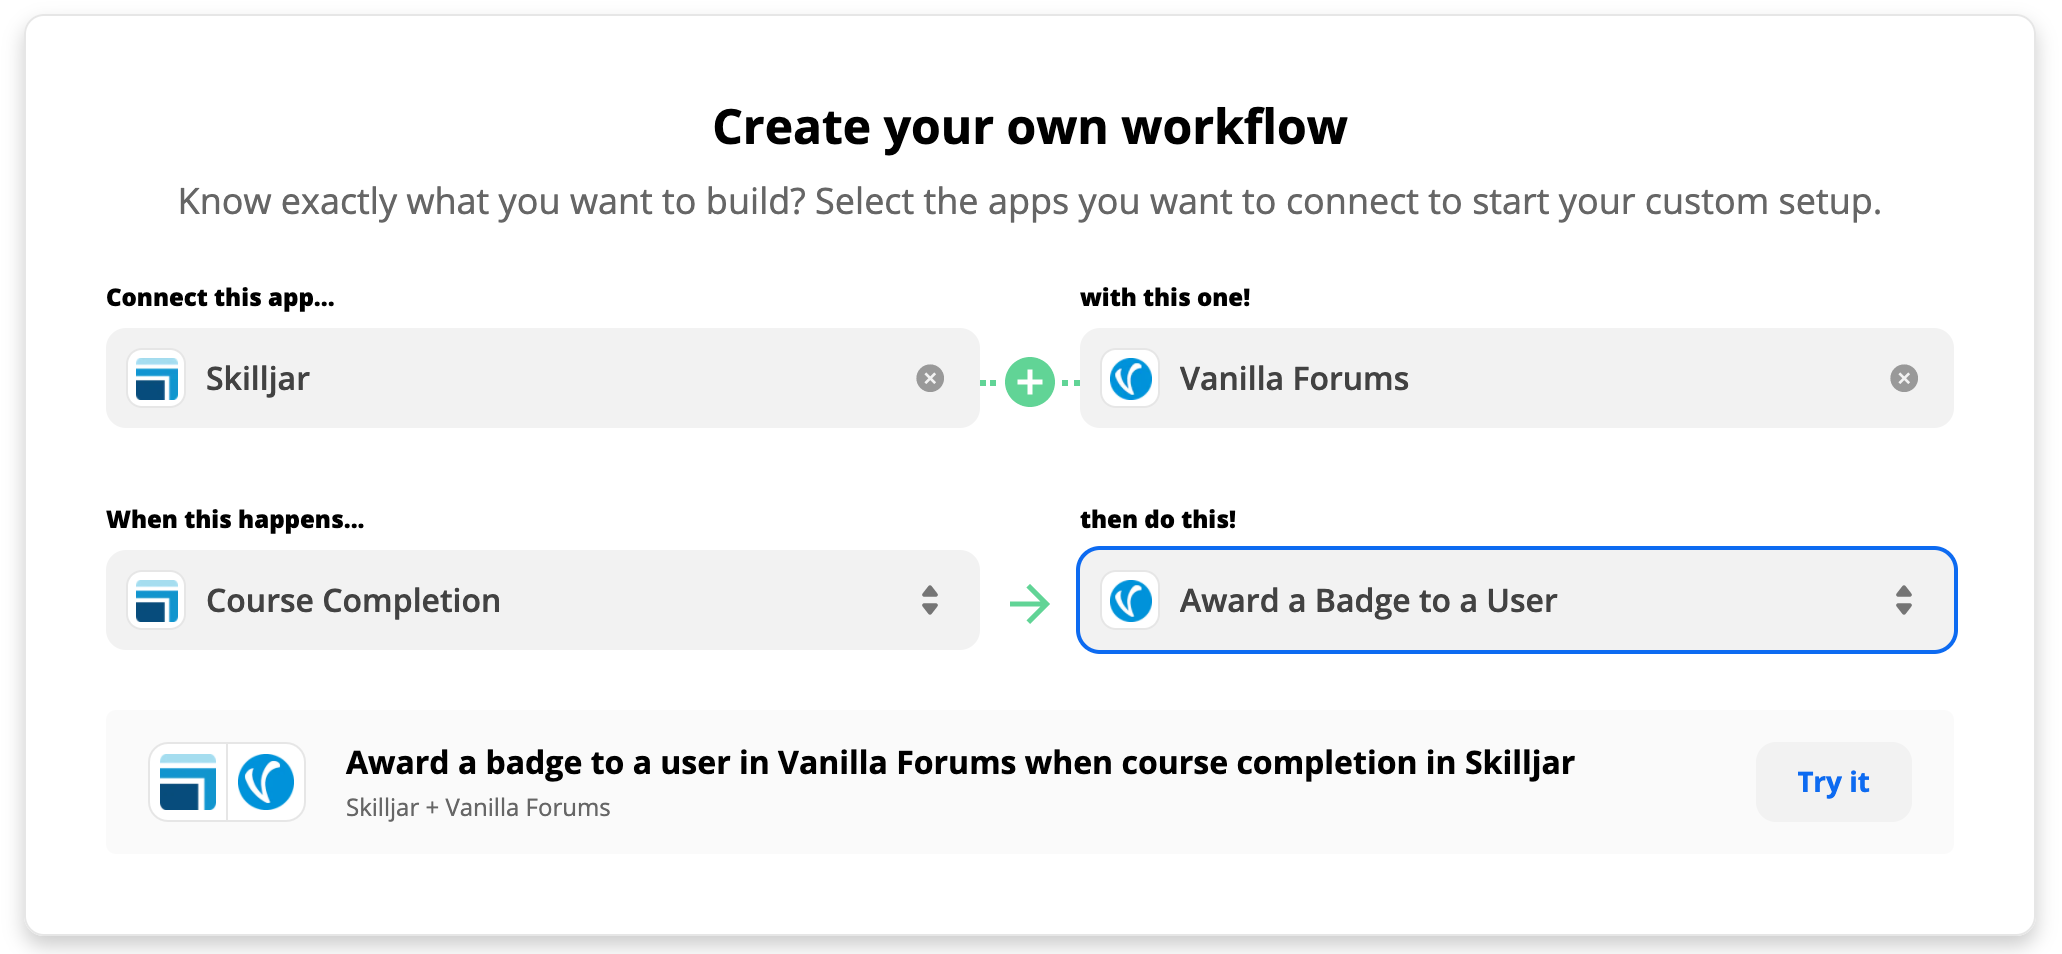
- Creating a new Zap on Zapier.com connecting SkillJar with Vanilla
- Selecting "Course Completion" as my trigger
- Selecting "Award a badge to a user" as my action

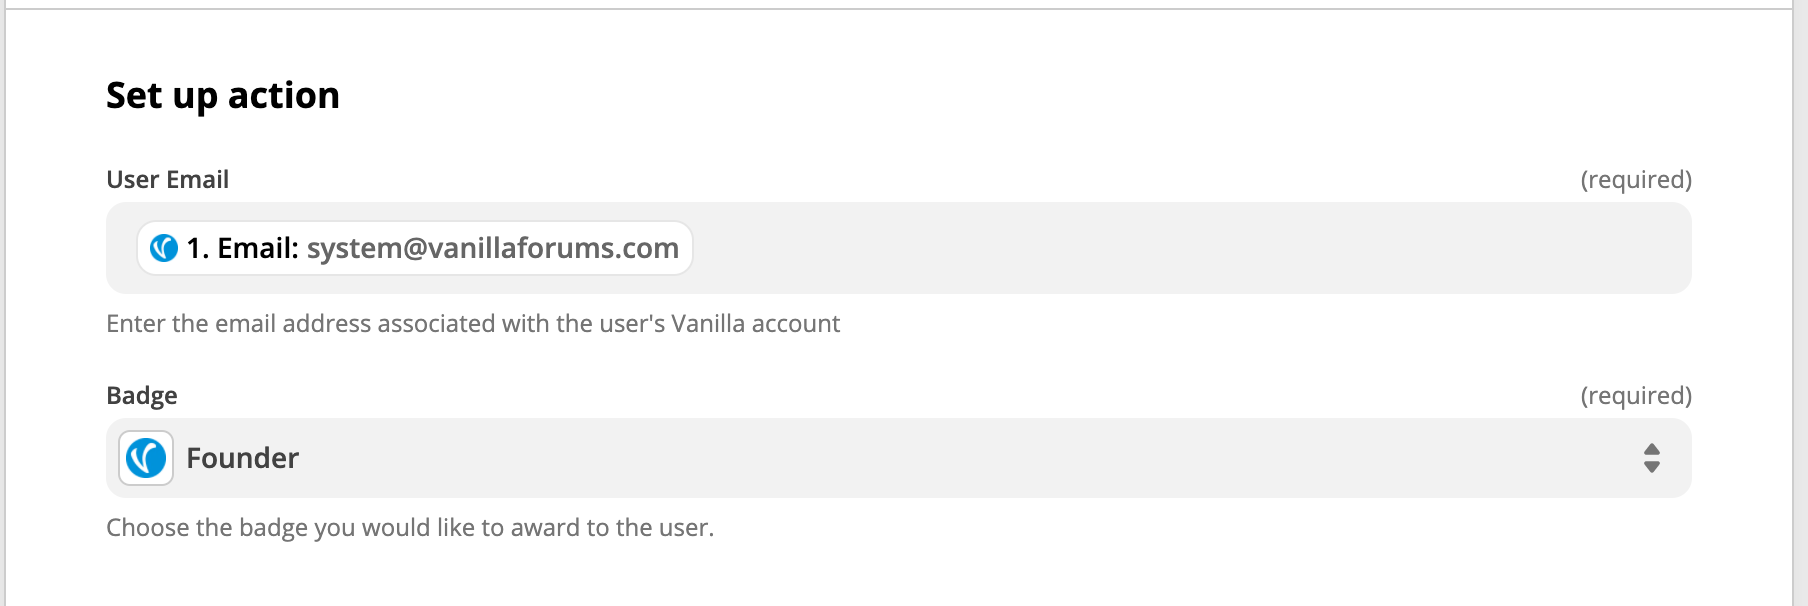
Once I create my workflow and set up my trigger, I need to set up the action with Vanilla. To do this:
- I identify which field in Skilljar contains the user's email-address, this is so we can match the user who has completed the course, with their community account.
- I select the badge I would like to award to the users who complete my Skilljar courses.
Award a badge to new members when they join your Vanilla community.
If you're launching a new community, you might decide you'd like to award badges to users when they join your community as a way of recognizing your founding members. You can now automate this workflow using our new "Award a badge to a user" action, along with our "User added" trigger in Zapier

Once you've created the workflow, set up the trigger and action. To set up the Award a Badge action:
- Select "Email" in the User Email input field. N.B. If it does not appear at first, click the "Show all options" link at the bottom.
- Select the badge you would like new users to receive

Initiate Zapier workflows when new Community Events are posted.
We've added a new Zapier trigger to allow you to create Zaps and automate workflows when new Events are added in your Vanilla Community.
For example, I can create a Zaps to :
- publish Social Media messages when an event is posted in my community.
- create calendar events in Google when an event is posted in my community.
- send an email when an event is posted in my community.
When you set up this trigger you will have the option of selecting a category.
- You can skip this step if you'd like your Zap to fire for all events posted in your community, regardless of whiich category they are posted
- You can choose a category if you'd like your Zap to fire only when events are added to a specific category.
- If you are using Subcommunities, you can select the subcommunities category if you'd like your Zap to fire when events are added to a specific subcommunity.

N.B. We do not yet support Group Events with this trigger.
New Theme variables for Tags and Labels
We've added theme settings and variables to allow you to customize the look and feel of tags and labels on the discussion list and Popular Tags widget.
You'll recognize "labels" as our Announcement, Closed and Q&A Status Labels. These appear on discussions by default and are not clickable. We differentiate these from user-generated "Tags" which can be enabled on the new Foundation discussion list via the theme editor, and in the Popular Tags widget. These are clickable and lead to a list of all discussions using that tag.

You can now customize the styles for both labels and tags using the theme editor.
When editing your theme, go to the Discussion List section. Here we have added two new settings - Label Tag Preset and User Tag Preset - to allow you to choose from 4 standard styles for tags and labels:

Presets include:
Greyscale:

Standard:

Primary:

Colored:

By default, the color used for both Primary and Colored options will be your Brand Colour.
To customize the colors used tags, you can use the Advanced Settings panel in your theme editor to customize your theme variables for the presets you've selected:
tags.primarytags.standardtags.greyscaletags.colored
Each of these four presets can be customized by defining the following color properties:
fontColor
bgColor
borderColor
fontColorState
bgColorState
borderColorState
Example: tags.standard.borderColor: "#a31d14")
Select the preset used in the tag cloud using this variable. By default, this is set to "standard." :
tags.tagCloud.tagPreset: "standard" | "primary" | "greyscale" | "colored"
Select the preset used for labels in discussion list items using this variable. By default, this is to "greyscale.":
discussionList.labels.tagPreset: "standard" | "primary" | "greyscale" | "colored"
Select the preset used for user tags in discussion list items using this variable. By default, this is set to "standard.":
discussionList.userTags.tagPreset: "standard" | "primary" | "greyscale" | "colored"
These variables are documented in our Theme Variables Reference doc:
Bug Fixes & Improvements
- Add DeepL addon
- Add limit to Q&A unanswered counts
- Add machine translation support for KB articles
- Add option to disable external link warning
- Add default locale dropdown to Language Setting Tab
- Add machine translation button to kb article menu
- Add settings modal to configure locale translation service
- Add transient key meta for knowledge base
- Add whitelisting upload domains for leaving redirects
- Add SQL syntax highlighting
- Add New UI for Locale Settings
- Add management of all allowed tag types
- Add OpenAPI specification for EKM API endpoints
- Add a check for invalid format strings on group descriptions
- Fix "discussion" and "comment" strings not translated for Featured Categories widget
- Fix "Spam Queue" modal closing by replacing it's destination URL
- Fix articles API endpoint returning incorrect data
- Fix badges module view title
- Fix banner image to take category first
- Fix fatal Groups error during no-email registration
- Fix styling in autocomplete control
- Fix group search uncaught error when searching as a guest
- Fix hidden reaction pop-up
- Fix incorrect global styles applied in Theme Editor Preview
- Fix memory limit size on profiles export
- Fix negative category depth for category picker
- Fix personal info view permission check for roles index endpoint
- Fix pockets being hidden by compatibility background layer
- Fix reactions module displaying wrong user's records
- Fix array parameters in API docs
- Fix widgets appearing twice
- Fix truncating search result excerpts
- Fix checkboxes not appearing during SSO connect